Portraits And Their Diversity
Having experimented now with various genres of photography I find myself being drawn to portrait work, I find the interaction with the subject interesting and enjoyable. I enjoy the diversity of portraiture, the different feels and looks you can achieve. Commercial, fashion, wedding, event and editorial portraiture leaves quite a large field of photography to explore, different lighting set ups, types of lighting, types of diffusers and soft boxes etc...
The Portrait
A photographic portrait is in which the face and its expression is predominant. The
intent is to display the likeness, personality, and even the mood of the
person. For this reason, in photography a portrait is generally not a snapshot,
but a composed image of a person in a still position. A portrait often shows a
person looking directly at the painter or photographer, in order to most
successfully engage the subject with the viewer.
Portrait photography is a popular commercial industry all
over the world. Many people enjoy having professionally made family portraits
to hang in their homes, or special portraits to commemorate certain events,
such as graduations or weddings. Since the dawn of photography, people have
made portraits. The popularity of the daguerreotype in the middle of the 19th
century was due in large part to the demand for inexpensive portraiture.
Studios sprang up in cities around the world, some cranking out more than 500
plates a day. The style of these early works reflected the technical challenges
associated with 30-second exposure times and the painterly aesthetic of the
time. Subjects were generally seated against plain backgrounds and lit with the
soft light of an overhead window and whatever else could be reflected with
mirrors.
As photographic techniques developed, an intrepid group of
photographers took their talents out of the studio and onto battlefields,
across oceans and into remote wilderness. William Shew's Daguerreotype Saloon,
Roger Fenton's Photographic Van and Mathew Brady's What-is-it? wagon set the
standards for making portraits and other photographs in the field.
Lighting for portraiture
When portrait photographs are composed and captured in a
studio, the photographer has control over the lighting of the composition of
the subject and can adjust direction and intensity of light. There are many
ways to light a subject's face, but there are several common lighting plans
which are easy enough to describe.
Three-point lighting
One of the most basic lighting plans is called three-point
lighting. This plan uses three (and sometimes four) lights to fully model
(bring out details and the three-dimensionality of) the subject's features. The
three main lights used in this light plan are as follows:
Key-Light
Also called a main light, the key light is usually placed to
one side of the subject's face, between 30 and 60 degrees off center and a bit
higher than eye level. The purpose of the Key-Light is to give shape
(modelling) to a subject, typically a face. This relies on the first principle
of lighting, white comes out of a plane and black goes back into a plane. The
depth of shadow created by the Main-Light can be controlled with a Fill-Light.
Fill-in light
In modern photography, the fill-in light is used to control
the contrast in the scene and is nearly always placed above the lens axis and
is a large light source (think of the sky behind your head when taking a
photograph). As the amount of light is less than the key-light (main-light),
the fill acts by lifting the shadows only (particularly relevant in digital
photography where the noise lives in the shadows). It is true to say that light
bounces around a room and fills in the shadows but this does not mean that a
fill-light should be placed opposite a key-light (main-light) and it does not soften
shadows, it lifts them. The relative intensity (ratio) of the Key-light to the
fill-light is most easily discussed in terms of "Stops" difference
(where a Stop is a doubling or halving of the intensity of light). A 2 Stop
reduction in intensity for the Fill-Light would be a typical start point to
maintain dimensionality (modelling) in a portrait (head and shoulder) shot.
Accent-Light
Accent-lights serve the purpose of accentuating a subject.
Typically an Accent-light will separate a subject from a background. Examples
would be a light shining onto a subject's hair to add a rim effect or shining
onto a background to lift the tones of a background. There can be many accent
lights in a shot, another example would be a spotlight on a handbag in a fashion
shot. When used for separation, i.e. a hair-light, the light should not be more
dominant than the main light for general use. Think in terms of a "Kiss of
moonlight", rather than a "Strike of lightning", although there
are no "shoulds" in photography and it is up to the photographer to
decide on the authorship of their shot.
Kicker
A Kicker is a form of Accent-Light. Often used to give a
backlit edge to a subject on the shadow side of the subject.
Butterfly lighting
Butterfly lighting by director Josef von Sternberg is used
to enhance Marlene Dietrich's features, in the iconic shot
From Shanghai Express, Paramount 1932
Photo by Don English
Butterfly lighting uses only two lights. The Key light is
placed directly in front of the subject, often above the camera or slightly to
one side, and a bit higher than is common for a three-point lighting plan. The
second light is a rim light. Often a reflector is placed below the subject's
face to provide fill light and soften shadows.
This lighting can be recognized by the strong light falling
on the forehead, the bridge of the nose and the upper cheeks, and by the
distinct shadow below the nose which often looks rather like a butterfly and
thus provides the name for this lighting plan. Butterfly lighting was a
favourite of famed Hollywood portraitist George Hurrell, which is why this
style of lighting is often called Paramount lighting.
Accessory lights
These lights can be added to basic lighting plans to provide
additional highlights or add background definition.
Background lights
Not so much a part of the portrait lighting plan, but rather
designed to provide illumination for the background behind the subject,
background lights can pick out details in the background, provide a halo effect
by illuminating a portion of a backdrop behind the subject's head, or turn the
background pure white by filling it with light.
Other lighting equipment
Most lights used in modern photography are a flash of some
sort. The lighting for portraiture is typically diffused by bouncing it from
the inside of an umbrella, or by using a soft box. A soft box is a fabric box,
encasing a photo strobe head, one side of which is made of translucent fabric.
This provides a softer lighting for portrait work and is often considered more
appealing than the harsh light often cast by open strobes. Hair and background
lights are usually not diffused. It is more important to control light spillage
to other areas of the subject. Snoots, barn doors and flags or gobos help focus
the lights exactly where the photographer wants them. Background lights are
sometimes used with color gels placed in front of the light to create coloured
backgrounds.
Rembrandt lighting
Rembrandt lighting is a method of studio lighting in which
the subjects face is well lit on one side with only a small triangle of light
appearing on the opposite cheek, such as in the photograph below.

Split Lighting
Split lighting is similar to Rembrandt type of lighting but
even more dramatic. Another term used for this type of lighting is “side
lighting”, used a lot in film noir cinematography. To achieve this look, just
place your main light all the way to the side of your subject. The image will
have one side well lit and the opposite in shadow. Then it’s up to you how much
you want to add detail to the shadows. Just place a second light to the
opposite side of lit area of the subject’s face and adjust the distance.
By placing the fill far away from the subject, you’ll be
able to add just the right amount of the detail. If you place the light too
close, then you’ll end up losing the side lighting effect. You may also add a
background light and aim it to your background. This will help separate the
subject from your background and will give you a three dimensional image.
Broad Light
With this set up you don’t really need to change the
position of your lights much, compared to Rembrandt or split lighting. The
reason it is called “broad light” style, is because the longer side of the
subject’s face is lit. All you need to do is to have your subject face away
from the light, which most of the times is positioned at 45 degrees from the
subject. The subject’s chin, however, will turn to the opposite direction from
the light, therefore the subject’s face from his/her nose to his/her ear will
be well lit. So, is very easy to go from Rembrandt style to broad light style
by just moving the position of the subject.
Also, remember you may have the subject’s face in broad
light style but have the body in Rembrandt style by just having the body face
away from the light. If, on the other hand, the body faces the light, then it
will be broadly lit.
Loop Lighting
The loop light style is just a slight variation from the
Paramount light. All you have to do is move the light to one side, usually to
the right of the camera, but still have it at a high angle. This style, because
of the shadows it creates, gives a sense of depth that other styles don’t have.
The reason is called looped lighting is because of the shadow that is created
under and to the side of the nose that is loop-shaped.
Key Light
The function of the key is to shape the subject. It should
draw attention to the front plane (the “mask”) of the face. Where you place the
key light will determine how the subject is rendered. You can create smoothness
on the subject’s face by placing the light near the camera and close to the
camera/subject axis, or you can emphasize texture and shape by skimming the
light across the subject from the side.
The key light should be a high-intensity light. If using
diffusion, such as an umbrella or softbox, the assembly should be supported on
a sturdy stand or boom arm to prevent it from tipping over. If undiffused, the
key light should have barn doors affixed to control the light and prevent lens
flare.
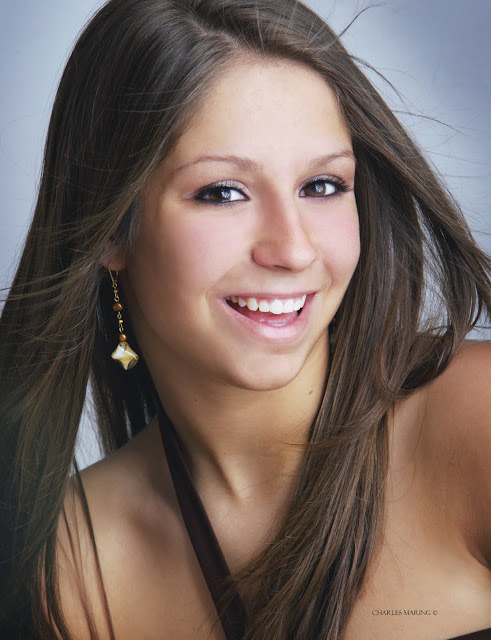
Here is an example of a really big key light. Charles Maring often uses a 7-foot Profoto reflector as a single key light with no fill. In the close-up of the senior’s eyes (below), you can see the differentiated interior of the round reflector, with varying degrees of reflectivity mirrored in her eyes. A single strobe fired into this reflector created this amazingly soft wraparound lighting. The exposure was at f/16 to keep all the girl’s hair in focus.

In most cases, the key light is placed above and to the side
of the face so that it illuminates both eye sockets and creates a shadow on the
side of the nose. The nose shadow should not cross over onto the cheek, nor
should it go down into the lip area.
When the face is turned for posing, the key light must also
be moved to maintain the lighting pattern. For example, the light will be
positioned at approximately a 45-degree angle to the camera when photographing
the full face of a subject. However, when the subject turns to show the camera
a two-thirds facial view, the key light will need to shift with the camera to
maintain the same lighting pattern as in the first shot.
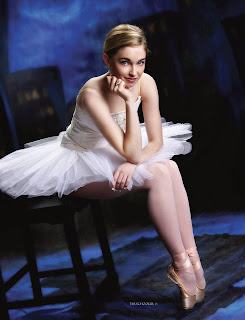
Normally, you will want to position the main light close to
your subject without it appearing in the frame. A good working distance for
your key light, depending on your room dimensions, is eight to twelve feet.
Sometimes, however, you will not be able to get the skin to “pop,” regardless
of how many slight adjustments you make to the key light. This probably means
that your light is too close to the subject. Move the light back or feather it.
To get an accurate exposure reading, position a handheld
exposure meter directly in front of the subject’s face and point it toward the
light source. Make a few exposures and verify the exposure on the camera’s LCD.
If your system allows you to check a histogram of the exposure, check it to
make sure you have a full range of highlight and shadow detail.
Fill Light.
Just as the key light defines the lighting, the fill light
augments it, controlling the lightness or darkness of the shadows created by
the key light. Because it does not create visible shadows, the fill light is
defined as a secondary light source.
The fill light should always be diffused. If it is equipped
with a simple diffuser, a piece of frosted plastic or acetate in a screen or
frame that mounts over the parabolic reflector, it should also have barn doors
attached. If using a more diffused light source, such as an umbrella or
softbox, be sure that you are not “spilling” light into unwanted areas of the
scene, such as the background. As with all lights, these units can be
feathered, aiming the core of light away from the subject and just using the
edge of the beam of light.
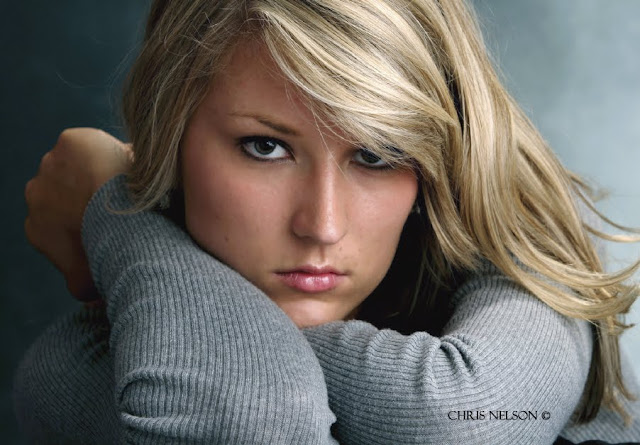
Chris Nelson
photographed this young lady with a softbox as a main light. He used a silvered
reflector for fill, a strip light for the hair light, and a background light.
The softbox and strip light were set to the same output level; the background
light was set to a stop less. The camera angle was about a foot over the
subject using a telephoto lens. He used a fan on low to give her hair some fill
and lift. Chris says of this pose, “Never use it unless your subject has long
sleeves on, and don’t use it if the arms are abnormally large or well
developed.”
The best place for the fill source is as close as possible
to the camera-to-subject axis. All lights, no matter where they are or how big,
create shadows. By placing the fill light as near the camera as possible, all
the shadows that are created by that light are cast behind the subject and are
less visible to the camera.
When placing the fill light, keep a watch out for unwanted
highlights. If the fill light is too close to the subject, it often produces
its own set of specular highlights, which show up in the shadow area of the
face and make the skin appear oily. If this is the case, move the camera and
light back slightly, or move the fill light laterally away from the camera
slightly. You might also try feathering the fill light in toward the camera a
bit. This method of limiting the fill light is preferable to closing down the
barn doors or lowering its intensity.
The fill light can also create multiple catchlights in the
subject’s eyes. These are small specular highlights in the iris. The effect of
two catchlights (one from the key light, one from the fill light) is to give
the subject a vacant stare or directionless gaze. This second set of
catchlights is usually removed in retouching.
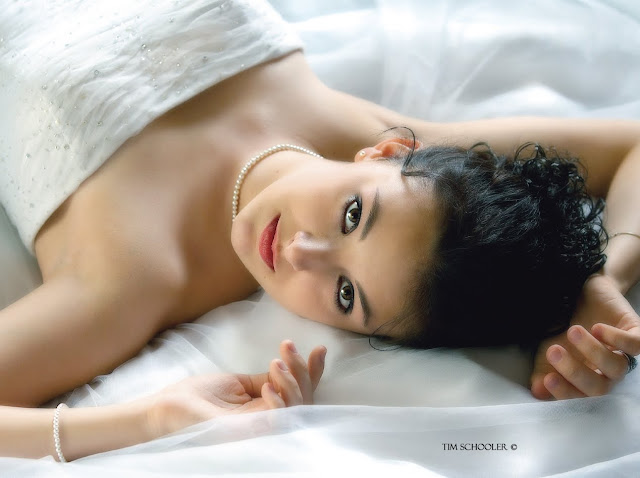
In this beautiful
glamour portrait by Tim Schooler, the key light comes from behind the subject a
little to camera right. You can determine this because the right side of her
face and nose are highlighted. The fill light, which is close to the same
intensity as the key light, comes fromcamera left and fills the shadow side of
the model’s face. Additional fill is achieved by the white crepe material,
which is reflecting light everywhere within the scene. You will notice that
even though the lights are fairly even in intensity, the key light still
provides direction and bias.
In simplified lighting patterns, the source of the fill
light may not be a light at all but a reflector that bounces light back onto
the subject. This means of fill-in has become quite popular in all forms of
photography. The reflectors available today are capable of reflecting any
percentage of light back on to the subject, from close to complete reflectance
with various mirrored or Mylar-covered reflectors to a very small percentage of
light with other types. Reflectors can also be adjusted almost infinitely just
by finessing the angle at which they are reflecting the fill light.
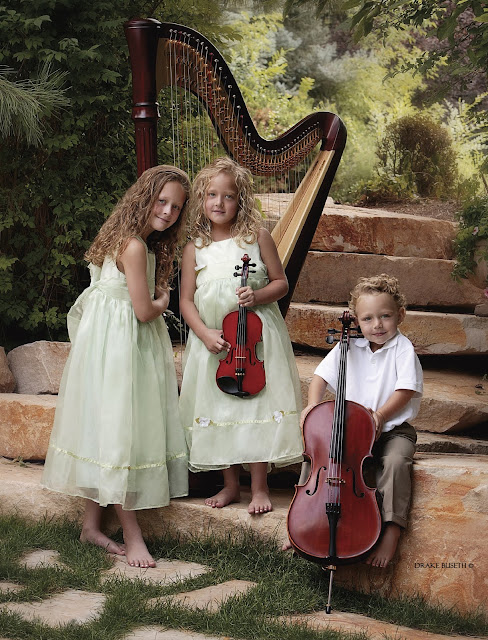
Master photographer Drake Buseth often uses the outdoors as
his studio. Even so, a key light and fill light are still called for. Here, a
large softbox was used over the lens as the key light and a large reflector was
angled up from beneath the camera as a fill-in source. The effect produces a
gentle lighting ratio.
THE PERFECT FILL
If it were a perfect world, fill light would be shadowless,
large, and even—encompassing every part of the subject from top to bottom and
left to right. The fill light would be soft and forgiving and variable. And it
would complement any type of key lighting introduced.
Just such an effect can be created using strobe heads in
wide-angle reflectors bounced into a white or neutral gray wall, or a flat
behind the camera (the surface must be neutral to ensure no color cast is
introduced). Usually, the first two lights are placed to either side of the
camera, then the third is placed over the camera and aimed high off the flat or
the wall/ceiling intersection.
These lights are placed close to the wall and ceiling,
creating a wall of soft light. These fill lights are then balanced to produce
an identical output across the subject. The key light, which may be placed to
the side or above the subject, will be equal to or more intense than the fill
source, creating a ratio between the fill and key lights.
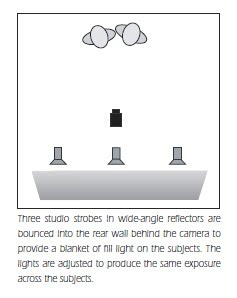
A variation on this setup is to rig a large white flat over
and behind the camera. Two or three strobe heads can then be bounced into the
flat for the same effect as described above. Some of the light is bounced off
the flat and onto the ceiling, providing a very large envelope of soft light.
No comments:
Post a Comment